
Tango Skiff designer Hank Bravo strongly suggests scarfing the plywood needed for the sides and the bottom panels with a hand plane. In his build notes, he states that scarfing plywood “can seem intimidating but it’s really not hard”. Lacking experience, I hesitated on an approach. I looked at both circular saw scarf jigs and router scarf jigs but ultimately decided to tackle the scarfs with a plane as suggested.
Tips for Scarfing Plywood
I started by practicing on scraps of cheap plywood just to get a feel for scarfing with a plane. My early attempts were… questionable but I persisted. After a couple of hours of messing around, I got comfortable enough to try some scraps of marine plywood. I’m glad I did this since the marine plywood has a very different feel to it. A bit more practice and I declared my scarfs “good enough.”
Some useful tips I picked up along the way include:
- Clamp your work down – This keeps the panels aligned with each other and makes it easier to use the plane.
- Work on a flat surface – The flatter the better so the scarfs are consistent.
- Lay one panel on top of the other, flip one over and scarf them together– Rather than perform each scarf separately, registering them to each other makes it easier and faster to create each half of the scarf joint.
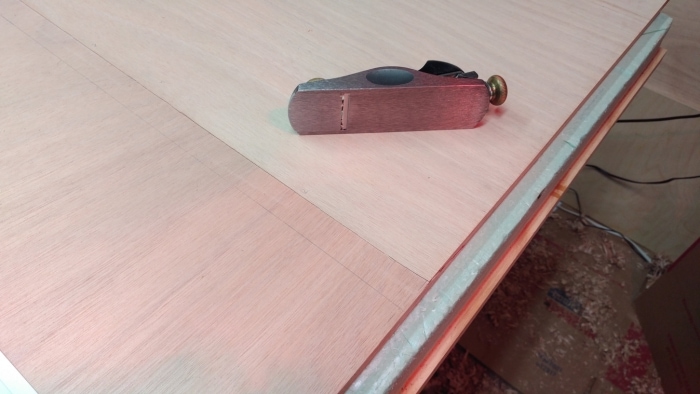
- The plane should be ‘scary sharp’ – I didn’t get this until I was much further than I’d like. However, it’s hard to ignore the value of a scary sharp plane.. I made it work with just a “sharp” plane but it meant a lot more wear and tear on my hands than was necessary. Once I understood “scary sharp”, the process was easier and less subject to gouging.
- Keep the plies in the plywood parallel to each other – Use them as a guide to help keep the scarfs flat.
- Check periodically with a straight edge – A 6″ Engineer’s Square is an easy way to gauge your planing progress.
- Some concaveness is ok – Thickened epoxy is gap filling and ultimately stronger than the wood itself.
- Don’t worry about a knife edge on the plywood – It’s really not necessary and is going to be very fragile.
- Check and recheck the direction of the scarfs – If you want to have the scarfs facing a certain direction, check and recheck. It’s easy to get confused as you’re moving the panels around. Don’t ask how I know.
Gluing the Scarf Joints
A few things to note when gluing up the scarfs:
- Avoid a starved joint – Brush on unthickened epoxy before applying thickened epoxy. Some of the unthickened epoxy will soak into the wood assuring a strong joint.
- Use packing tape to reduce the glue mess – Packing tape on either side of the scarf joint protects against glue spreading onto surrounding surfaces.
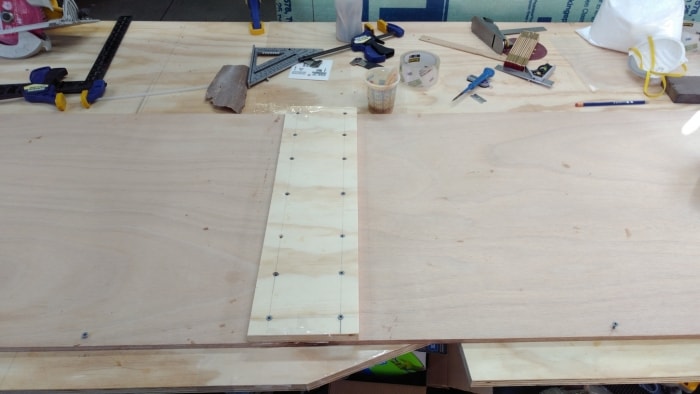
- Use “pressure plates” for consistent alignment and consistent pressure – Good alignment is important when joining plywood to create the 17′ long sides. To help with this, I used pressure plates made from 3/4″ plywood to positively hold down the panels during the glue up. With screws driven right through the panels and into the underlying work surface, I had consistent clamping. Later, I’ll fill the holes with thickened epoxy. See the image below.
- When aligning the scarf joint, don’t allow one panel to ride up over the other – You’re trying to create a continuous thickness and not a hump that requires sanding into the outer veneer to level. Once again, the Engineer’s square is your friend.
Final Thoughts
Much of this boat build is an adventure in developing skills sets. And so, I’m glad to have taken the time to add scarfing plywood as a skill. With Hank’s encouraging words and only a handful of scarf joints, I’m happy with the results.
Sources: Scarfing Basics by Russell Brown and various posts on the Woodenboat Forum